
Quite a few years ago, specifically Until 1983 when DNS servers were introduced, the way of surfing the Internet was very different from what is used today. In fact, all the web addresses were housed in a HOSTS file on the computer's hard drive, in such a way that to access a certain website, the server's IP address had to be previously saved to be able to access it, in a similar way to how telephones work (To call someone, you have to dial their number, but you will only know who you are calling if you have registered it before).
This today does not happen at all like that, we mostly use the domains of the websites to access, and it is here where the factor of DNS servers comes in, in charge of translating the domains into servers.
What are DNS servers?
As we mentioned, the Internet is not as simple as we limit ourselves to believing on many occasions. When typing a domain in the browser, (for example, windowsnoticias.com right now), what is really happening is that your computer is contacting, through your Internet provider, with a DNS server in order to obtain the IP address (the Internet identifier) of the web server, in such a way that you can finally access its content and, therefore, display the web page.
That is why, on many occasions, DNS servers are the most important to be able to guarantee access to the Internet correctlyIf it did not exist, it would be necessary to memorize a series of numbers for each website to be placed in the browser's address bar, much more difficult to memorize. And, as if that weren't enough, if it weren't for this it would be much more complicated to create websitesSince today IP addresses are usually shared within the same provider in order to save costs.

Why should I then change them on my computer?
In most cases, the DNS servers to use are defined by the router or modem itself that allows your Internet connections. In this way, as in most cases they are equipment provided by network providers, the servers used by default are those of the operator itself.
However, the problem with using this type of DNS servers is that they are somewhat slower than those of other companies like Google or Cloudflare, plus less guarantee your privacy and security online as they are the ones who process all your information, so we recommend modifying them.
This is how you can modify DNS servers in Windows 10
As we mentioned, changing the DNS servers is highly recommended on your computer. If you have a Windows 10 computer, you just have to follow the following steps:
- Access the windows settings Pressing on the keyboard of your computer Windows + I or from the access that you will find in the lower left corner of the Start menu.
- On the settings screen, select the option "Network and Internet" and, on the left side, make sure you are in the section "Status".
- In the advanced settings section, choose "Change adapter options", which will take you to a new window of the old Windows control panel.
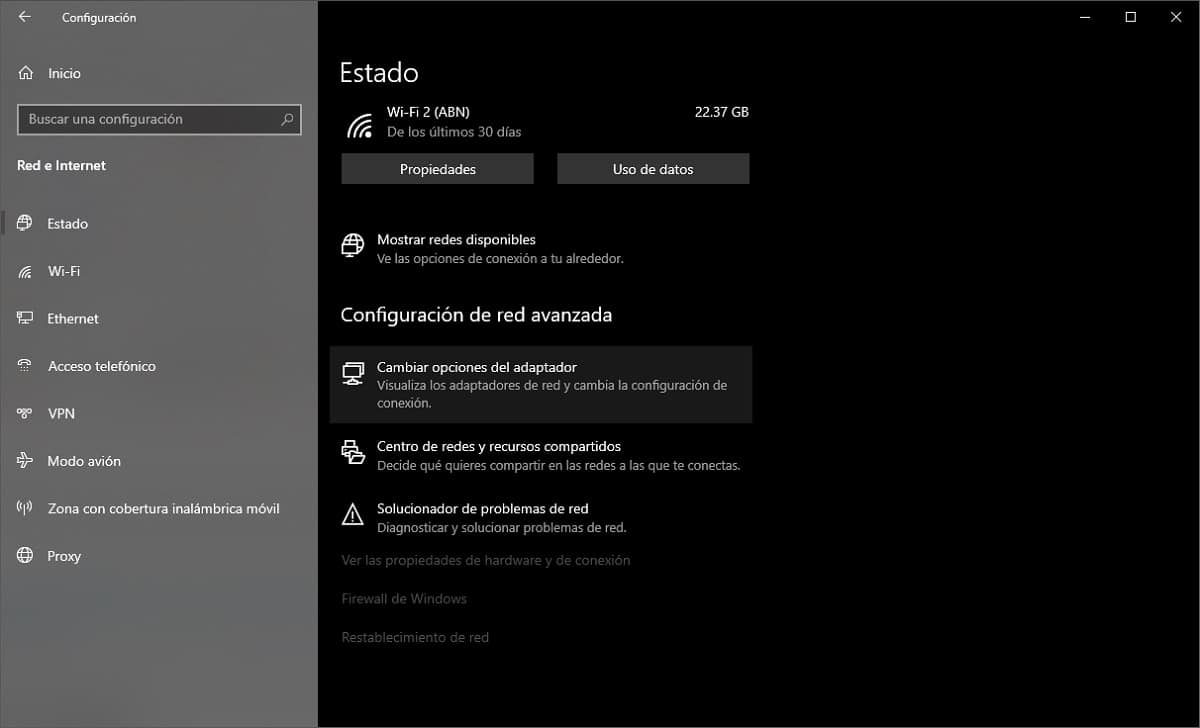
Choose "Change adapter options" within advanced network settings
- You will be able to see how all the wireless and network connections used by Windows are displayed in the new open window. You must select the one you are using and then right-click on it to access "Properties".
- Now You will have to look at two options, depending on whether you want to modify the DNS servers for IPv4 connections or if you want to modify it for IPv6. In most cases it will be IPv4, since it is in countries like Spain IPv6 is not usually used, but it depends on your connections:
- For IPv4, select the option "Internet Protocol version 4 (TCP / IPv4)" and use the button called "Properties".
- For IPv6, select the option "Internet Protocol version 6 (TCP / IPv4)" and use the button called "Properties".
- Then, check the box within those properties "Use the following DNS server addresses" and then enter the servers you want to use.
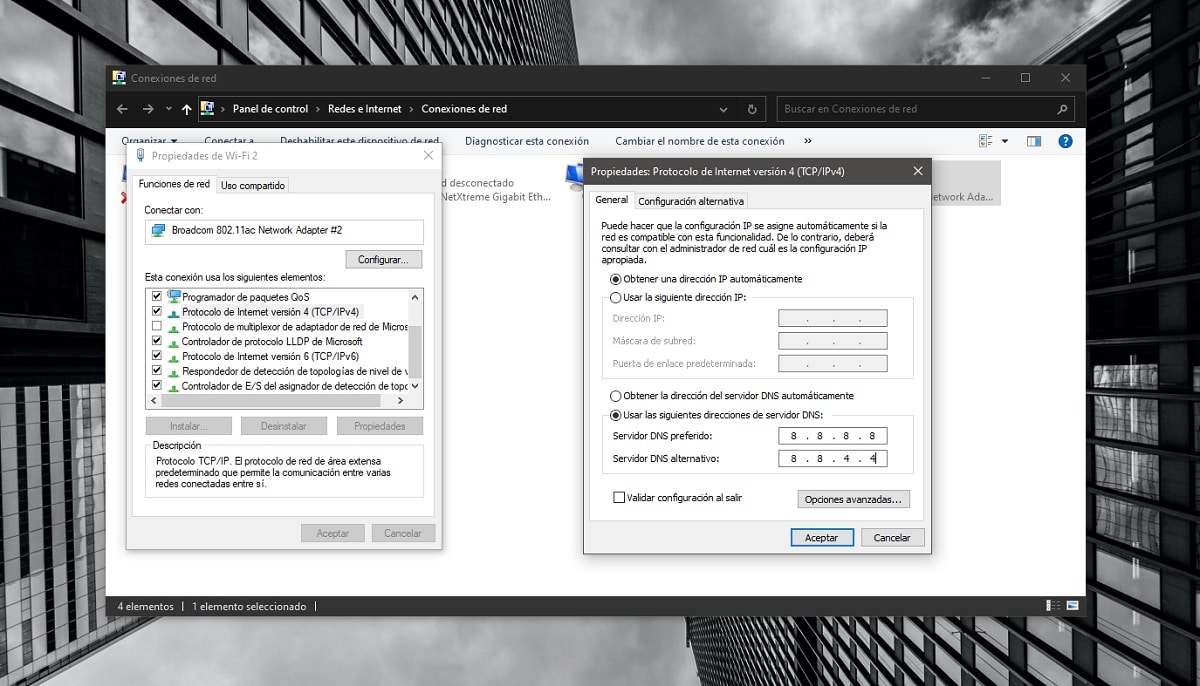
As free and public DNS servers, especially those of Google (8.8.8.8 and 8.8.4.4) or those of Cloudflare (1.1.1.1 and 1.0.0.1), which will allow you greater privacy as well as connection speed. However, if you don't know which one to choose, we recommend checking our guide to the best free and public DNS servers. You just have to enter them as your DNS servers and the information will be registered, with which your team will connect to them every time you access an Internet address.