
Surely many of you have tried to send a file or a folder with files via email or via pendrive and you have not succeeded because the file takes up a lot of space. It will also have happened to you that you have sent a file or files that you did not want more people to read, so you have wished that the file had a password to access its content.
Well, this is something that can be achieved in an easy way. We just have to install a tool for Windows called a compressor and thanks to this we can create smaller files that can contain a password so that no one can access it. In order to do all this, we first have to install the compressor tool. In general Windows 10 already brings a compressor with it but it is not as complete as other external tools. The most popular compressors are WinZip and WinRar, however they are not free compressors but after a trial period we have to pay for their use or we will have reduced capacities. It is because of that the option we have chosen is called 7-Zip, a free Open Source compressor that we can download from here and install it on our Windows.
7-Zip is a free and free alternative to create compressed files
Once we have installed 7-Zip in our Windows, in the secondary menus will appear a new entry called 7-Zip. After marking this option, several submenus will appear that we will use to create the compressed file.
Now, to compress a file we have to mark or select the folder or files that we want to compress. We right click on them and we go to the 7-Zip menu. There we choose the option that we like the most. Generally the best options are "Add to Archive .." or "Add to XXX.zip". The difference between these options is that the first allows us to select the options we want to create the file while the second option creates a compressed file with that name and the standard options of the application.
If we only want to create a compressed file, the quickest thing is to opt for the second option, but If we want to create a compressed file with a password, we have to choose the first option. Once we choose this option, a screen like the following one will appear:
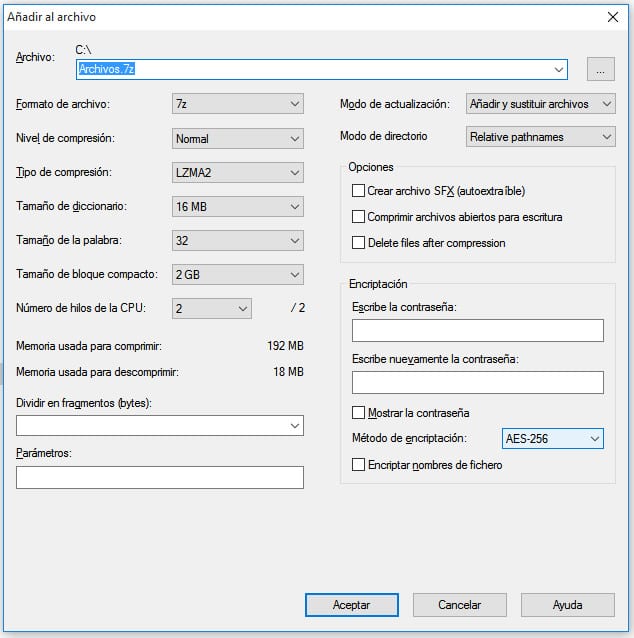
In it, we not only have to mark the name of the file to be compressed, but also the format we want, generally we have to mark the "zip" option. On the Encryption option we have to select the ZipCrypto or AES-256 option and enter the password in the password field. We press the Ok button and the compressed file with password will be created. As you can see, it is easy and simple to do.