In an increasingly digitized world where paper documents seem destined to go down in history, the need to scan physical documents seems to be less. Even so, we can still find situations in which we are going to need to do it. If that is your case, in this post we are going to see what needs to be done to scan documents in windows 10
In which cases is it still necessary to scan a document? There are many examples. One of them is quite typical: a contract that is signed by hand and that must be sent later by email. However, there are other utilities, such as making Scanned "copies" of important documents, to save them to a computer or other digital file in case the original document is lost or destroyed. We could say that it is a different way of making a Backup.
One more example: we all keep saving at home old photos on paper, before the advent of digital cameras and cell phones with cameras. Well, there are many people who scan them to keep a copy, use them in digital publications (blogs, social networks, etc.) or share them with friends and family.
Surely all these arguments have convinced you that scanning documents in Windows 10 is still something quite useful. Let's see how to do it below.
Windows 10 Scanner app
It goes without saying that, to scan any document in Windows 10, we are going to need the basic hardware: a scanner or printer able to run scan function as well. These are devices that many people have at home and that, if they do not have them, are not too expensive to acquire.
Windows 10 already includes an application specifically designed for this purpose: Windows scanner, which allows us to easily digitize documents and photographs to save them later wherever you want. Is that how it works:
Connection with scanner or printer

Logically, to make the transition from the physical element (paper, photography, etc.) to the digital element, the role of the scanning device or, where appropriate, of the printer is essential. These devices must be connected to our PC.
The most common way to make this connection is via USB cable. There are "all-in-one" printer models that, even with the wireless option, require a USB connection for the scanning task.

In general, simply connecting the cable, the information on the steps we must follow to install the scanner or printer (sometimes drivers are needed) will appear on the screen until the "device connected" message is displayed.
Obviously, everything is easier when we can connect the computer with the scanner via bluetooth, thus eliminating the hassle and inconvenience of cables. Once both devices, scanner/printer and PC are connected, we can start.
scanning process

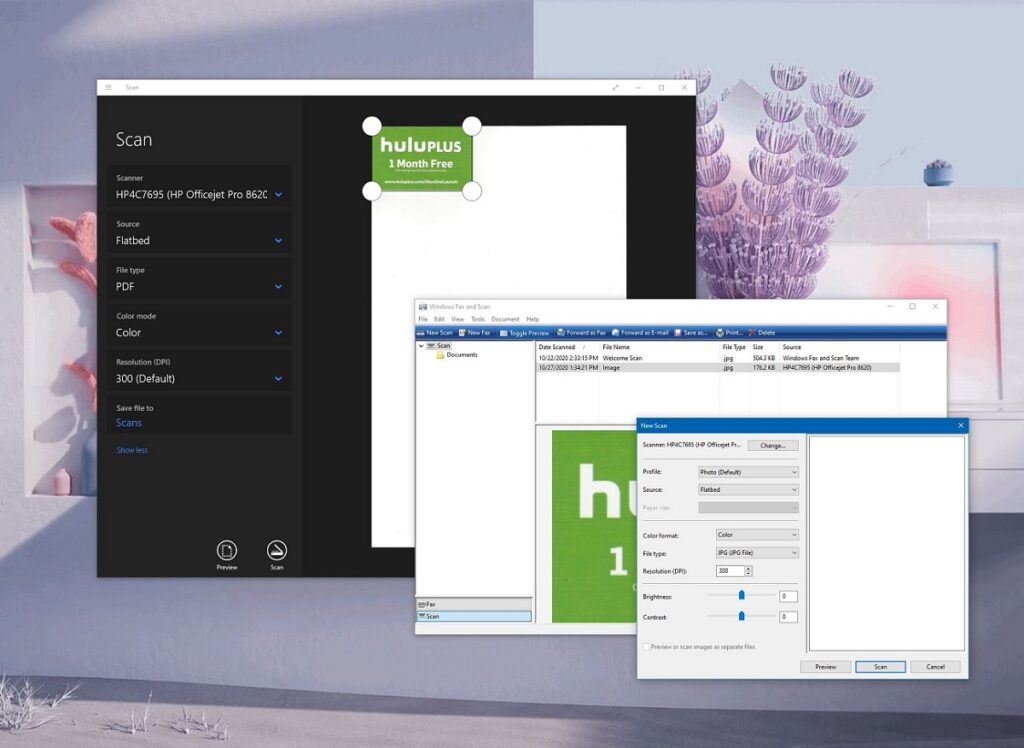
After introducing the document that we want to digitize into the scanner or printer, we go to the PC and open the Windows Start Menu. There we type the word "Scanner". Among the different results that Windows will suggest, we will choose the one found under the Applications* section.
Once the application is selected, we must choose the type of file we want. These are the options:
- JPG, a lightweight image format widely used for photographs.
- PNG, format more oriented to drawings or graphics.
- TIFF, which in the case of images can be an alternative to the previous two.
- Bitmap, less recommended because, unlike the others we have cited, it cannot be compressed.
- PDF, universal format for documents.
- OpenXPS and XPS, the alternatives to PDF created by Microsoft, although in general much less used.
(*) There is another option that we can use, that of "Windows Fax and Scanner", although its handling is somewhat more complicated.
After choosing the file type, we have the possibility to choose the color mode (scanning in color, grayscale or black and white) and the resolution (PPP), which in many cases will depend on the capacity of each scanner. Naturally, the higher the resolution, the better the quality of the image or scanned document. You also have to know that the higher the resolution, the longer the scanning process will take.
After making all the previous adjustments, before starting the process we have the possibility of knowing how it will be by clicking on the button "Preview". In large documents and images it is advisable to select a small part of the screen as a sample, which we will obtain in a couple of seconds.
And with everything ready, the last step is to click on "Digitize" to start the scanning process. In a matter of seconds (or minutes if it is a very large image), we will have the results, which we can store in the location of the computer that we want.