
The width and height of the margins is essential to configure the final appearance of a writing, which is especially important when we talk about a text that we have to present. In this post we are going to see how to adjust margins in word and give our documents the look we want.
This function, which is incorporated in most word processing programs, is especially interesting for shaping all types of documents, whatever their format and purpose. In Word It is also possible to adjust these margins until you get a fully customized configuration. Or several, to apply in texts of different themes.
predefined parameters
When we open a new document in Word, we have a series of predefined parameters by Microsoft Office for the margins of the texts. In theory, it is a series of configurations that should cover all our needs. At least those of the most frequent uses.
The configuration of the default vertical and horizontal margins is similar to the one that determines the font type and size, the line spacing, etc. In many cases, users simply accept this previous configuration and do not change anything. Others, the most perfectionists or those who seek get a more professional look or something more personal for your texts, take advantage of the different options that exist to adjust the margins of Word.
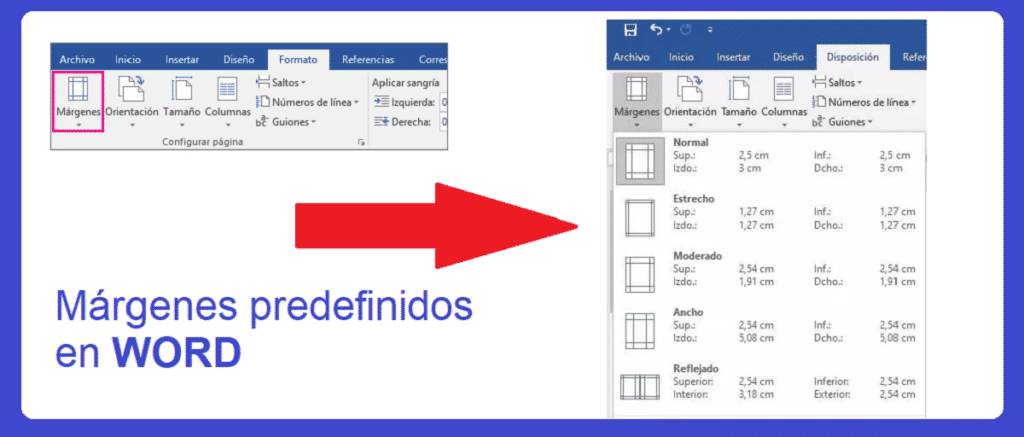
These predefined margins that Word offers by default are the following, although there may be more or fewer options depending on the version of the software we are using:
- Normal (top and bottom: 2,5 cm – left and right: 3 cm).
- Narrow (top and bottom: 1,27 cm – left and right: 1,27 cm).
- Moderate (top and bottom: 2,54 cm – left and right: 1,91 cm).
- Ancho Steak: (top and bottom: 2,5 cm – left and right: 5,08 cm).
- mirrored (top, bottom and outside: 2,54 cm – inside: 3,18 cm).
To help us choose between these options, the text editor itself presents us with a preview with different types of margins. In this way we can check the suitability of each of the options. As shown in the image above, to see these margin settings you just have to go to the top tool bar, select "Format" (or "Layout", depending on the version of the program) and in the drop-down menu that appears, choose the option we want.
Custom margins
It is true that these predefined options may be more than enough for a large part of the users, but it is possible that in certain circumstances we have the need to work on text documents with our own custom margins. this is how we can adjust them according to our tastes or our needs.
To do this, we have two options:
- resort to one manual configuration.
- O well set new default settings.
The first option may be valid for a specific document, while the second will be more advisable if we are going to have to generate or work with a specific format on a more or less regular basis.
Manual setup
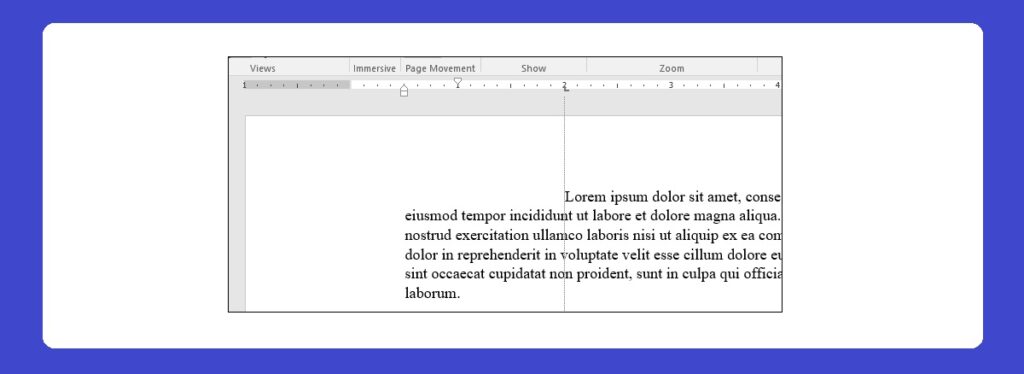
To set the margins of a Word text manually, what you have to do is open the document and modify the bar that is just below the toolbar with the cursor. is that long bar above the blank sheet, similar to a ruler or a tape measure, which is marked with a series of numbers.
With the help of the mouse we can move these three markers to the right or to the left to establish what is known as the indentation of the text:
- Triangle up: marks the beginning of the text in general or left margin.
- Downward Triangle: Marks the start of the first line of text in each paragraph.
- Square: marks the end of the text or right margin.
The main limitation of this method is that it will only serve us to set the left and right margins, but not for the top and bottom margins.
Custom settings
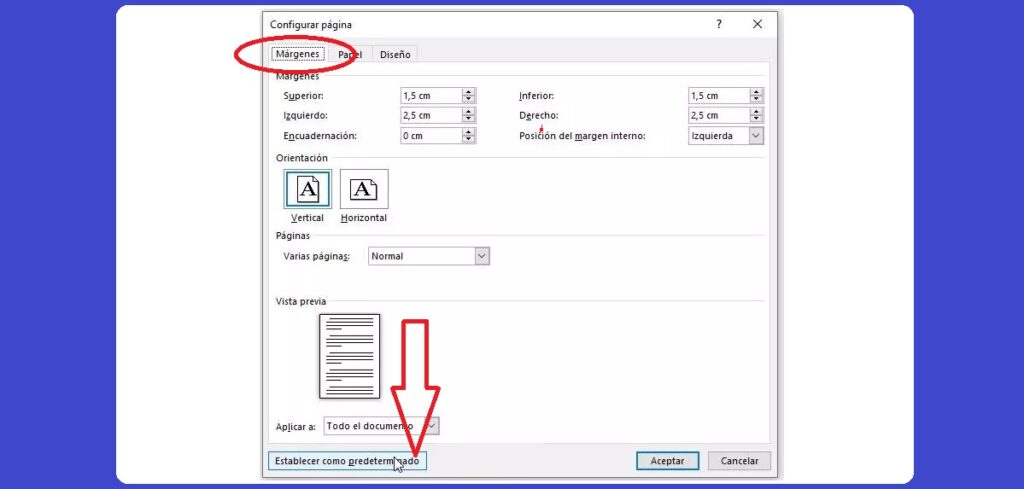
At the bottom of the default margins dropdown we find the custom configuration option. By clicking on this button, we will find new possibilities, as shown in the image above.
Obviously, we have to focus on the "margins" tab, where we can set all the parameters as we want or need:
- Top and bottom, left and right margins.
- Optionally, binding margins.
- Page orientation (landscape or portrait).
We will also be able to choose if we want to apply these changes to one or several pages of the document or to the entire document. The preview will be of great help to us to know if the chosen margins are really the ones we want to establish. Finally, we will press the button "Set as Default" so that this configuration is saved in our Word to use on more occasions.
Finally, if we want to establish this configuration in other documents that we have already generated and have saved, we must go to the "Layout" option, then select "Margins" and click on "Last Custom Configuration".