Yesterday we tell you what a DLNA server is and what it's for, as you can read in this article. In it we tell you that we can configure it on our computer with Windows 10. This is what we are going to explain below, the steps we have to follow to configure our DLNA server on our computer.
As we have already told you, we have one on the computer. Therefore, the process that we have to carry out in Windows 10 is configuration. We will not have to install anything, something that undoubtedly makes the process much faster and easier at all times.
As usual in this type of situation, we have to go to the configuration of Windows 10 first. We can do it by opening the start menu and clicking on the cogwheel icon, or we have another way. You can use a combination of keys, Win + I, which allows us to open the configuration directly in a simple way.

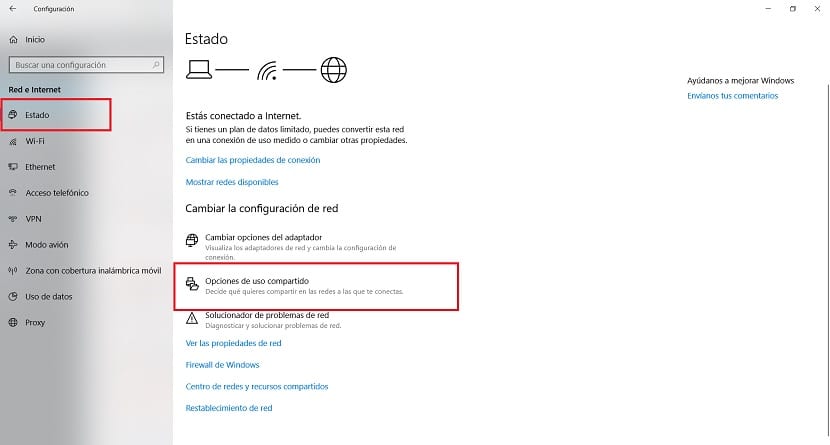
Within the configuration we have to go to the network and Internet section. When it opens on the screen, we will have to go directly to the section called Change the connection properties that appears on the screen. It does not matter if we are connected to WiFi or a cable. We have to enter this section.
The first thing we are asked is the network profile. We have only two options in this case. By default, Windows 10 marks it as a public profile, but the one that we are interested in at this time is the private or domestic. So we select the private profile and then we move on to the next step.
In it we have to go back to Network and Internet settings. In the state section, where we were already before. We have to go down towards the end of it, where we are going to find the sharing options section. We are going to click on it, to decide the elements that we are going to share with the rest of the computers that are connected to that network with DLNA.

Next, a new window will open in which we find the advanced sharing settings. We have to fill in a couple of options in it. The first one is that the computer will automatically detect this home network. This will allow us not to have to do anything to configure it. We also have to activate the option called "Enable file and printer sharing." In this way, the printer will also be part of this network that we are creating with DLNA in Windows 10.
Then you have to unfold the options in the All networks section. Here we have the most important elements to consider. So we will be able to configure aspects to our liking. One of which we have to select is the multimedia streaming options. As it is the first time we enter, a notice will appear that says that we are allowing other devices to access multimedia files on our Windows 10 computer. Simply press the activate option to continue.
In the next step we can name the computer and other devices that we have connected to the other DLNA network. It is something that you must configure to your liking. When you have done it, you have to give it to accept. Then, we go down to the end of the whole, where we find the password protection option. There we will have to turn on the Turn off sharing option with password protection. In this way, we will not have to enter a password when using these elements. When you have configured everything, click on save changes.

With these steps, we have already carried out the necessary steps for the DLNA server setup on our Windows 10 computer. As you can see, it is not complicated, but it is a somewhat long process. But you will not have problems with it.