
Windows Defender is the default security tool in Windows 10. It is a tool that works at all times and runs in the background, so that it can detect any possible threat on the computer. From time to time, this tool usually shows us some notifications. Something that has been increasing over time, with new versions and can be very annoying.
Therefore, there are users who want to end these Windows Defender notifications on your computer. Luckily, we can configure the notifications of this security tool in a very simple way. So reduce that number or completely end them in Windows 10.
The best thing in this regard is not to disable all notifications. Rather, we must leave only those for threats that can attack Windows 10. This is something that will significantly reduce the number of notices that this tool shows us. So, just in case something happens we will receive a notification on the computer.

Over time, the effectiveness of this security tool has improved notably. But coupled with this, the notifications that are displayed on the computer have increased. In many cases they are annoying, because they do not provide important information. They even show you notifications to tell you that no threats have been found. So they are not always equally important, which means that we can eliminate them in Windows 10. The steps we have to follow in this case are shown below.
nDisable Windows Defender Notifications
To do this, as usual in these cases, we have to first open the Windows 10 configuration. When we are inside it, we have to enter the section called Update and security. There we will be able to manage some aspects of this security tool. On the left side of the screen we have to click on Windows Defender. It is also possible to open the security tool directly on the computer. To do this, go to the shield icon that appears in the system tray and then click on the gear icon and enter notifications.
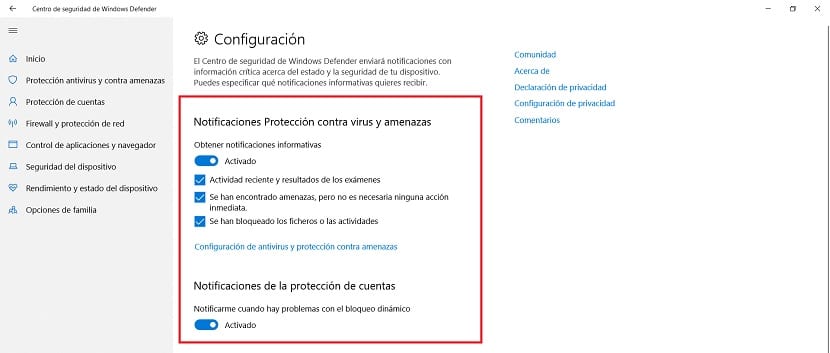
Within the notifications section you have to enter the option Manage notifications. There we will be able to adjust these options about which notifications we want to receive and which ones not. It will then show us the management page for these Windows Defender notifications. There is a section called Notifications Protection against viruses and threats. It is in this where we will be able to determine which ones we want to receive, depending on what we are looking for.
Some of these notifications are informative, that we are not getting any important information. So we can deactivate the switch next to it. So they are disabled. These are the notifications that Windows 10 usually shows us in many cases and that are the ones that are annoying. The ones that we have mentioned that tell us that they have not found anything in their analysis or that there are no threats. So they really do not provide us with anything useful at any time. So we can stop receiving them.

In this way, we have deactivated the informative ones. But Windows Defender will show us only those that are of importance. The good thing is that we can manage these notifications at all times. In this section you can see all the notifications that are in the section, so you can determine in each case which ones you want to use.
So if when you have configured this, you consider that few arrive on your computer, you will be able to modify as many as you want. The process is always the same in all cases. Thus, you can have fewer notifications from the security tool on your computer, which will make it much less annoying than usual. Have you also modified the notifications on any occasion?