
When browsing in Google Chrome, it can take a long time for a web page to load. When this happens, we find that the message that says ERR_CONNECTION_TIMED_OUT. This means that the server has taken too long to load, so we cannot enter the website at this time. It is a problem that has a number of different solutions.
Without a doubt, it is something that can be especially annoying on many occasions. Therefore, we have to do something in this regard, and the solutions that exist are the most varied in this case. Thus, this message should not appear when we navigate in Google Chrome.
Clear browsing data in Chrome
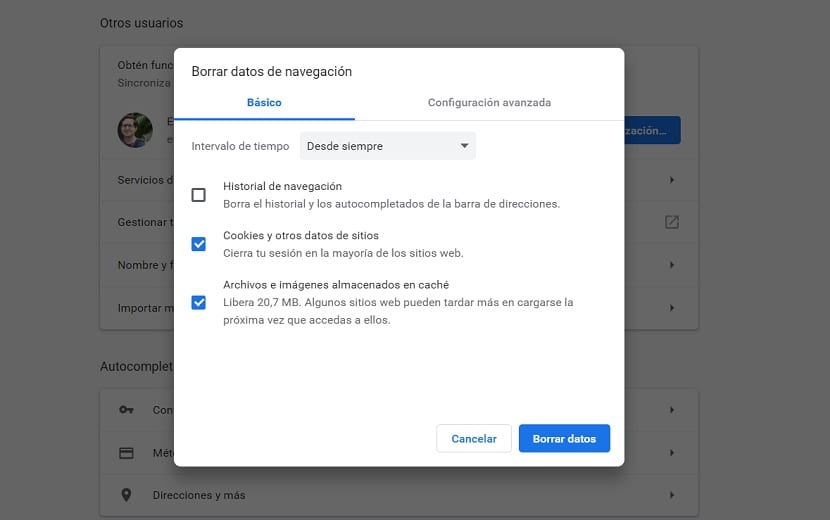
One of the first things that is recommended at all times is clearing the cache in Google Chrome. It is possible that too many cookies and navigation data have accumulated, which prevent us from being able to navigate in the best way on the network and access said web page. Therefore, it is one of the first steps to take into account in this regard. The steps to follow in this case are simple:
- Open Google Chrome on the computer
- Click on the three vertical dots
- Go to More tools
- From the options that appear on the right, click on Clear browsing data
- There you choose the data you want to delete
- Click on accept

LAN settings in Windows 10
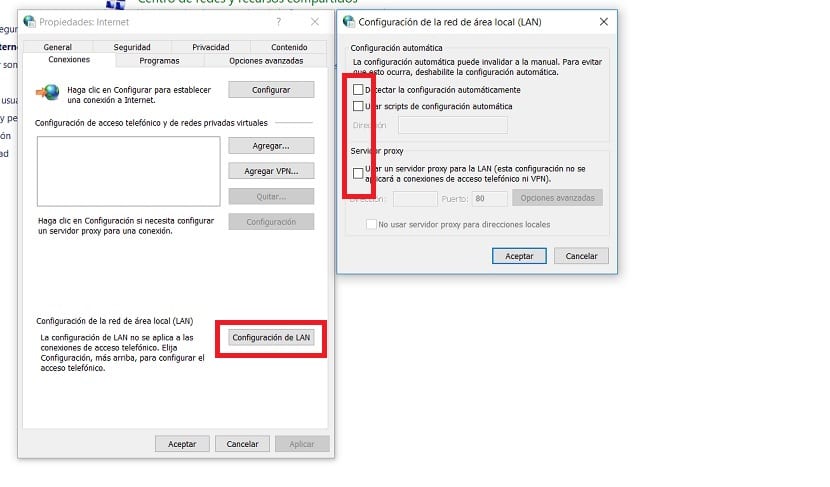
Another option that we can turn to, which is usually one of the ones that works best in this regard, is to adjust the LAN settings on the computer. In many cases, a bad configuration in this case is the problem that prevents us from having access to a certain web page. Therefore, if we configure this in the correct way, which only requires unchecking an option, then we should see how this problem becomes part of the past.
- Open the control panel
- Click on networks and Internet
- Click on the option called Internet Options
- A new sale opens, in it, click on the connections tab at the top
- Click on the LAN settings button
- We deactivate all the options in that section (uncheck all options)
It is a method that tends to work in many cases, so we should be able to enter again without problems on this page using Google Chrome in the browser. Although it is not the only option we have.
Hosts file

On the other hand, we must See also the hosts file in Windows 10. This is a file on your computer that is used by the operating system to map host names to various IP addresses. Its function is to direct the network nodes in a computer network. Although it may happen that this file is misconfigured at a certain time, or that there is an IP address added that should not be, generating said block.
The file can be located on the computer at the following path: C: \ Windows \ System32 \ drivers \ etc and we will see that there is a file called Hosts in that folder. We have to open it on the computer using the notepad. We will see that there are some IP addresses in it. It must be verified that the one that interests us has a # in front. If not, we remove it from the list and save this document.
So, we go to Google Chrome, where we should be able to use said website again without problems.
Update drivers
It may happen that an outdated driver, in this case the network adapter, is giving us problems when entering a website in Google Chrome. Therefore, it is important to keep it updated at all times. We must go to the device manager on the computer and there look for the network adapter. We right-click on it and then we give it to look for updates. We are allowed to search for updates online, in case any have been released that we have not received.
After a few seconds we can know if there is an update for the same and in this way to be able to have it already updated. On many occasions, a timely update helps us prevent this type of problem when browsing in Google Chrome. So the problem should be solved in this way.
Clear DNS cache
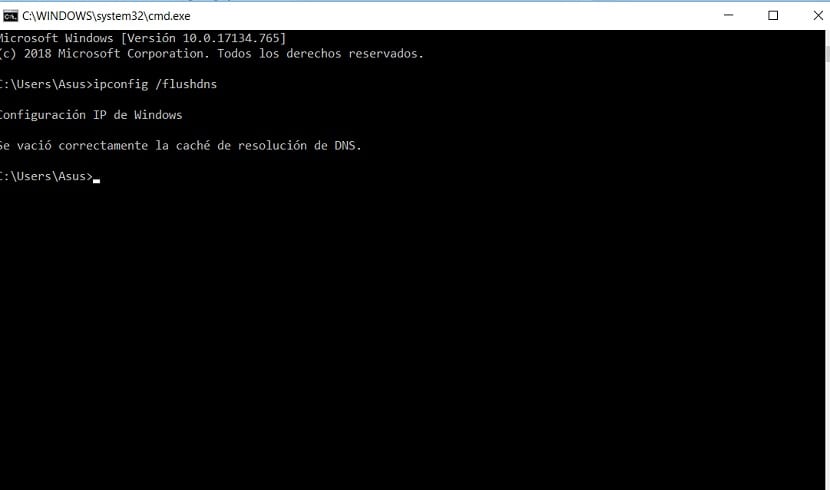
One last option that can help us in this case. As we browse the Internet, a cache is stored, which makes accessing the websites that we visit frequently faster and simpler at all times. Unfortunately, this can also cause too much data to accumulate, which can lead to connection errors in some situations. Then, clearing the DNS cache is not a bad idea.
We have to open a run lead (Win + R) and use the cmd.exe command in it. A command line will then open on the screen, where we must enter the command: ipconfig / flushdns and in this way delete said DNS cache. It should be a solution in this sense and be able to access said website again in Google Chrome.