
Having a TPM 2.0 chip it is an essential requirement for any computer when installing Windows 11. And that is the most frequent reason why some computers, only 1 or 2 years old, cannot upgrade to the new version of Microsoft's operating system. Fortunately, there are ways to Install Windows 11 without TPM.
The first thing we have to know is what exactly the TPM chip is and if our computer has it. Later, we will address the question of what can be done to install Windows in case you do not have it.
What is the TPM chip?
The TPM (Trusted Platform Modulei.e. Trusted Platform Module) is a chip designed to enhance a computer's encryption capabilities, something that not all teams have.
Without going into too many technicalities or complexities, it can be said that it is a small chip, it is a cryptoprocessor that is usually installed on the computer's motherboard and whose main function is to store Windows encryption keys securely. A basic element to preserve the privacy of our files.
The key to how TPM chips work is that they are physically separate from the main CPU. This offers a great advantage: all sensitive information is stored on the chip itself, which becomes a kind of safe against hackers and viruses. Even when the computer is infected by some type of malware, its basic functionalities will be out of danger.
As we said, the TPM is not installed on all computers, although it is becoming more frequent. On the other hand, in those that are present, it is normal for it to be in sleep mode. passive installed. This means that the chip is there, but it comes deactivated from the factory, so in order to use it it is necessary to activate it first.
The trick to install Windows 11 without TPM
But, what to do if our computer does not have a TPM 2.0 chip? There is no need to resign yourself, as there are other methods. In fact, the most important help on this issue comes from Microsoft. So the first thing we have to do is go to the Windows 11 official download website and enter the section "Windows 11 Installation Assistant". There we directly click on "Download now".
After downloading this Windows 11 installation assistant, we simply click on the file to start the installation. Here we find the first setback in the form of a message: "This PC can't run Windows 11."
There is no need to be alarmed, that is the consequence of not having the TPM 2.0 chip installed or activated. It is at this point when you have to apply the "trick" to install Windows 11 without TPM. The process is a bit long and you have to execute it step by step for it to take effect and we can get the result we are looking for:
- First of all, we must use the following key combination: Windows+R This will open the "Run" box. As simple as that.
- In the box, we write the command regedit and press "Enter".
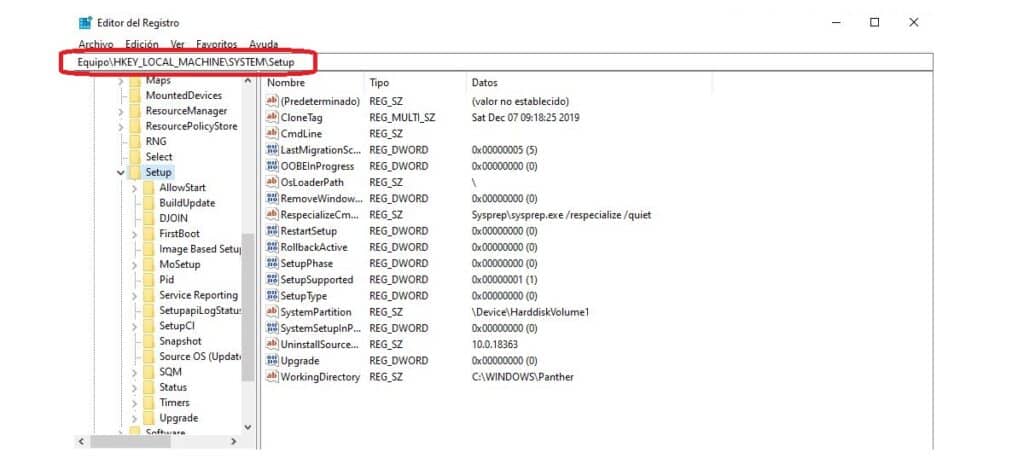
- The new panel that opens is the Registry Editor.*
- In it we have to locate the correct folder by typing the following path in the search bar at the top of the box: HKEY_LOCAL_MACHINE \ SYSTEM \ Setup. Then we validate by pressing “Enter”.
- The next step is to right-click on the folder "Setup".
- Next, we select "New" and then "Clue". With this we will be creating a new folder that is shown in the left column of the screen.
- The recommended name to name the new folder is "LabConfig".
- Now you have to right click on the newly created "LabConfig" folder and, in the menu that is displayed, select "New".
- Then we must choose the option "DWORD (32-bit) Value".
- After creating this value, it appears on the right side of the screen to be renamed like this: «BypassTPMCheck”. Once named, we double-click on it.
- Finally, in the space of "Value Information" we wrote «1» and click on "To accept".
(*) Important: the Registry Editor is a very efficient tool, but you have to know how to use it well to avoid greater evils. In the specific case at hand, it is best to follow the instructions that we present to you to the letter, without improvising.
After these eleven steps we will have completed a third of the process, but what lies ahead is simple, since it is a simple repetition. You have to follow the process from the beginning two more times, paying special attention to step number 10, in which we will write "BypassRAMCheck" y "BypassSecureBootCheck" respectively.
And after this, the final step is to close the Registry Editor, and re-run the Windows 11 Setup Wizard. The error message that appeared before will no longer be displayed and we can proceed with the installation without any obstacles.