
If we have too many applications that run when we start Windows 10, we can make this startup slower. For this reason, it is usually recommended to eliminate some of them from this start. But, it may happen that you want there to be one that always starts automatically. This is something that we can configure at all times. In addition, the reality is that it is not difficult to achieve.
We explain below how we can make a application to run when Windows 10 starts. Thus, if there is an app that you want to run automatically when we start the computer, it can be done. There are several methods for this, but we will teach you a simple, but effective one.
For this, we will create a shortcut in a hidden folder in Windows 10. Therefore, the first thing we have to do is have a view of the hidden folders in the system. So within the file explorer, you must click on the View tab. Then you have to click on the option Show or hide. Then several options will appear and we have to make sure that the Hidden elements option is checked.

Once this is done, we are ready to start this process on the computer. We are then going to create a shortcut so that this application will run automatically when we start Windows 10. The steps to follow are not complex at all, so all users can carry them out without problem.
Steps to follow
The first thing we are going to have to do is go to the programs folder at the start of Windows 10. Within the file explorer we have to follow a certain path. We must get into This Team first. Then, access the Local disk and there you have to enter the following folders: ProgramData> Microsoft> Windows> Start Menu> Programs> Start.
If you prefer, you can copy the address directly in the address bar from the file explorer as it is much faster. The specific path that we have to enter in this case would be: C: \ ProgramData \ Microsoft \ Windows \ Start Menu \ Programs \ StartUp. Therefore, once inside this folder, we can continue with the process that we are carrying out.
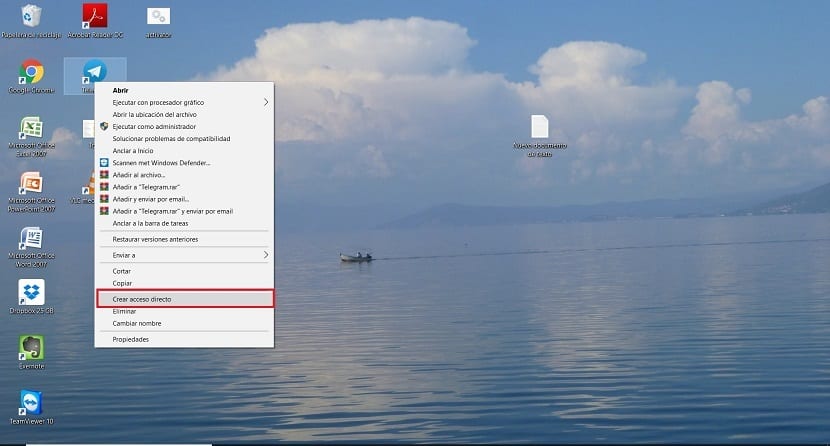
Before proceeding, you must create the shortcuts on the desktop for these applications that you want to run automatically at Windows 10 startup. We do this because the operating system does not allow us to create shortcuts in this Startup folder. Therefore, we have to move them once we have created them. To be able to create a shortcut, right-click on the executable for that app. Several options will appear, one of which is to create the shortcut.
Then when you've already created these shortcuts, you have to drag them into the Startup folder. Just press and hold on the icon and drag it into the folder. When you drop the icon into that folder, it will have already been moved. Do it with the accesses of all those apps that you want to start automatically in Windows 10. Once we have completed these steps, we can move on to the last details of this process.
As the Startup folder is a very important one in Windows 10, to be able to move these shortcuts, they will ask you for administrator permissions. If you are already logged into the computer administrator, when you get a message on the screen, you simply have to give it to continue. In case you are not the administrator, then you will have to ask the person who has these permissions to complete the process. It is essential to be able to carry it out.
With this we will have finished the process on the computer. We have already moved these icons to the home folder. So the next time you log in to Windows 10, these applications will run automatically. If at any time you want to change it, you can remove the icon from that folder, or use the task manager.