
In Windows 10 we usually receive notifications on a regular basis. They can be those that come from the operating system itself, such as saying that there is a bug or we have updates available, but applications can also issue notifications. In addition, there are times when several can reach us at the same time. Therefore, we have to give priority to some in our case.
This is something that we can manage at all times in Windows 10. The operating system has a way to manage the priority of the notifications we receive, so we limit this in some way. Thus, if several arrive at the same time, we will see the most important ones first.
While it is unusual for we will receive a large number of notifications at the same time, the priority option can serve us on more occasions. Since there are certain notifications that we really want to see, that we do not want to miss, because they provide some important information. While there are others that may not be so decisive.
Notification priority
The notification priority option in Windows 10 is made up of two sections. On the one hand, we will be able to give priority to these notifications, making some that appear ahead of others, in this sense. In addition, we also have the possibility of limit the number of notifications that we will see on the screen. So we configure this to our liking at all times in a simple way.
We are going to make use of the Windows 1st configuration in this case. To open it, we can use the Win + I key combination on the computer and it will open in the same after a few seconds. We can also open the start menu and then click on the cogwheel icon on the left. In these two ways, the computer settings will then be opened. Once it's opened, we can get started.
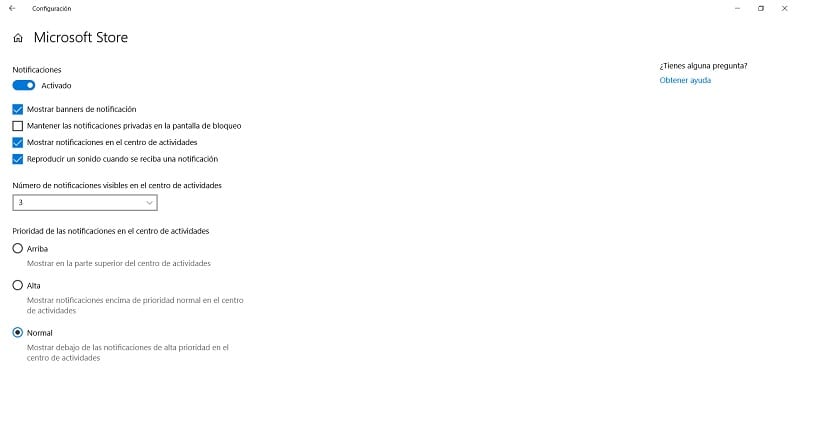
We will then enter the system section, which is usually the first one that appears on the screen in that case. When we are inside it, we look at the left part of the screen, where we have a column with all kinds of options. Among the options that come out we find the section of Notifications and actions, which is the one we have to click on in this case. We will then see the options in this section in the center of the screen. Click on the notifications of each app, to manage this.
In this case, we are interested in two sections as we have already mentioned. On the one hand, we will look at the option for the number of notifications visible in the activity center. Below it a drop-down list awaits us, where we have several options to choose from. We will have to select in our case how many we consider appropriate to be shown in Windows 10. If it turns out later that it is not suitable, we can always change it, in the same way. But the ideal is to have a low number in this sense, so that they are not too many or too annoying.
On the other hand we find the priority of notifications in the action center. In this case we are given three options in total from which to choose: Normal, High and Above. Below each of them we find a brief description, which allows us to better know in what consistency and what we can expect from them. So when we have found the one we consider to be the best on our Windows 10 computer, we select it. It is quite simple, and remember that we always have the possibility to modify this.
Therefore, with these steps we are modifying the priority of notifications of the activity center in Windows 10. It is not something complicated as you can see, but that we can configure in a few steps. So whenever you want to do it, it can be modified on your computer, the steps are always the same. A good way to give our computer a much more personalized use at all times, with better notification management.