
vectorize an image is a very interesting resource for illustrators and designers, although it can also be very useful for digital artists, logo designers and any user who works with images for their personal blog or professional presentations. In this post we explain how to do it.
But before addressing the question, it is necessary to know what the process of Vectorization. Many of the images that we find on the Internet or that we upload to our computers are made up of dots or pixels. That means its size is larger and editing jobs are slow and complex. On the other hand, vector images (generated using mathematical formulas) have a much smaller size and can be worked with more flexibility.
But the best thing about vector images is that They can be resized without losing quality. Compared with those that are made up of pixels, vectorized images maintain their original appearance, with perfect definition, when we increase or reduce their size. This way we prevent the image from appearing pixelated when we make any changes to it.
What is vectorizing an image?
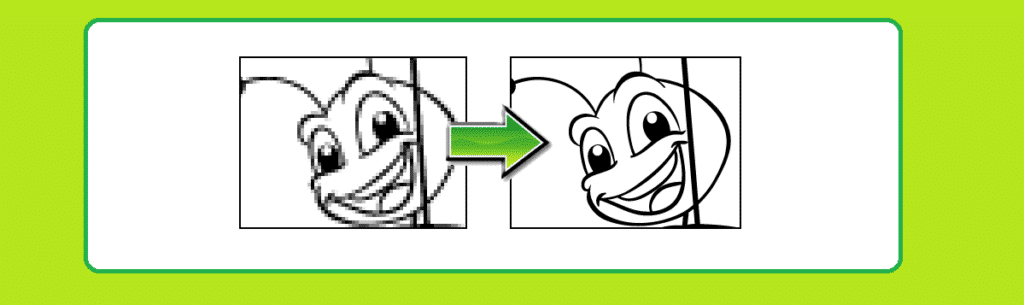
The vectorization process goes through convert images that are made up of pixels into images made up of vectors. Technically, it consists of transforming those pixels into lines, curves and points. Thus, an image that used to be a single block becomes a set of blocks that can be edited individually. In this way it is possible to achieve more precise editing and scaling work.
The file resulting from the vectorization process is saved in a series of certain formats: CDR, AI, SVG and EPS, mainly.
There are different techniques to create a vector image: from drawing polygons and lines, to filling the image with color. However, when we talk about vectorizing an existing image, i.e. converting a bitmap image to a vector, there are only two ways to do it:
- Drawing the shapes of the lines and curves of the vector figure on the image.
- Using a auto vectorization tool. Make serve programs create a new image in vector format based on the original image.
Once the transformation is complete, the final result can still be refined a little more by outlining its shapes, influencing the intensity of the color, softening or emphasizing its lines, etc.
Tools to vectorize images
Now that we know what vectorized images are and what are the mechanisms used to carry out vectorization, it is time to select the tool that can best help you achieve it. Here are some of the best:
Corel Draw

Many graphic designers around the world, both amateurs and professionals, regularly use Corel Draw. This program can also be used to create and edit vector images. Once we have installed it on our computer, the vectorization process is very simple, just follow these steps:
- To begin with, we open the Corel Draw program and create a new file,
- Then we must import the image that we want to vectorize (PNG or JPEG formats are valid).
- We click on the image and select the option Bitmap.
- Next, we select "Contour Tracing", after which a window opens in which you can edit the vector.
- Once the editing work is finished, we click on the image again and select "Organize" y "Ungroup."
Link: Corel Draw
Inkscape
A great free tool for creating vector images. With Inkscape it is not possible to vectorize an image online, it is necessary to download the program. Working with it is very simple, you just have to upload the image you want to work with and click on "Vectorize Bitmap".
There are three different filters to apply: brightness threshold, edge detection and color quantization. The first uses an algorithm that quantifies the chromatic content of each pixel to classify them into two categories; the second filter is used to generate an intermediate bitmap on which we can adjust the darkness and thickness of the edges of the vectorized image; finally, the last filter decides how many output colors there are to color the bitmap.
It looks complicated, but it is actually very simple. You just have to try each of these filters and see which one offers us the best result in each case.
Link: Inkscape
Illustration
Our third proposition is Adobe Illustrator, one of the most popular programs to create and edit vectors, capable of offering professional-level results, but at the same time within the reach of any user, whatever their knowledge.
How to vectorize an image in Illustrator? These are the steps to follow:
-
- First we start the Adobe Illustrator program and click on "Create a new file."
- Then we select the image to vectorize through the option "insert file".
- Next, we go to the image and click on Image Trace, whose arrow-shaped icon is found in the top bar.
- On the next screen, where the different vectorization styles are shown, we first select "High Fidelity Photo" and then click on the button "Expand".
- To finish the process, we click with the right mouse button and select "Ungroup."
Link: Illustration