
When we buy a computer, it comes with a specific version of the operating system installed. The most common is that it comes with Windows 10 as an operating system. But, as we use it, updates are coming to our computer. So, the version we have is changing over time. We have the ability to see all these updates.
Since in Windows 10 we have a history of updates. Thus, we can see all the updates that we have received over time. In addition to being able to check which version of the operating system is the one we currently have.
At present we have two different ways to access the update history in Windows 10. Both are just as valid. So it depends a little more on personal preferences or your knowledge as users. How can we access this history?
System log
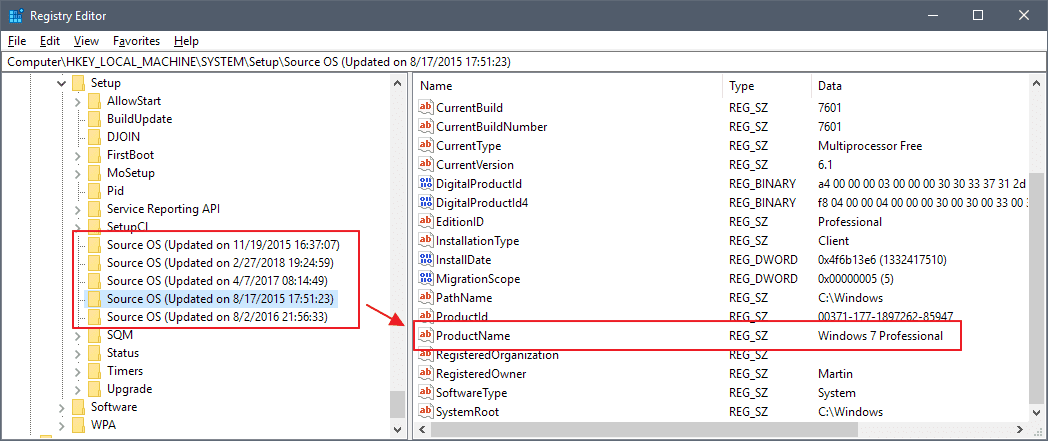
The first of the two ways is by making use of the system registry. To open the Windows registry we have to run the regedit command from a run window on the computer. So, we have to navigate to the following path:
HKEY_LOCAL_MACHINE \ SYSTEM \ Setup.
Under Setup we have to look for other keys that have the name Source OS. We will find a key with this name for each update. All of them make up the Windows 10 update history we were looking for. What's more, we can see the exact date and time the update was installed in the team. We will also have the string values that indicate the version of Windows 10 that was installed at that time.
In this way we already have access to this history in a simple way. Thus, in addition to seeing what version we currently have installed, we can also see the versions that we have gone through in all the time we have had the computer.
Command in PowerShell
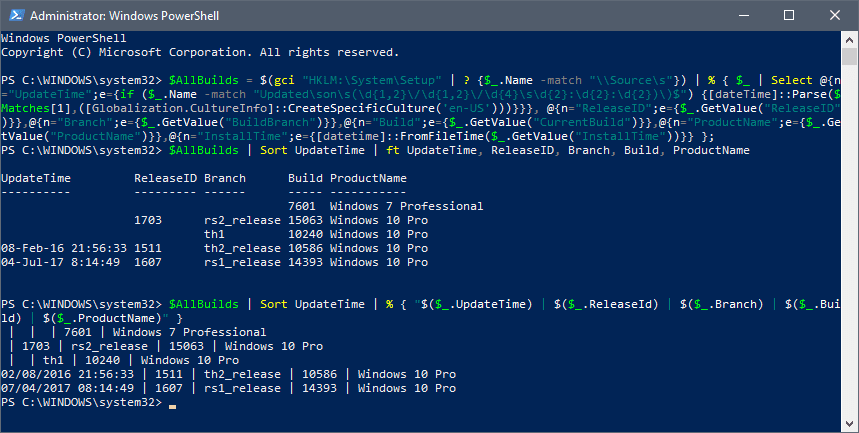
We have a second way available to access the Windows 10 update history. In this case we have to run a couple of commands from PowerShell to achieve it. The first thing we have to do then is open PowerShell. We write its name in the search box on the taskbar.
When we are at the command line, we have to execute this:
$ AllBuilds = $ (gci “HKLM: \ System \ Setup” |? {$ _. Name -match “\\ Source \ s”}) | % {$ _ | Select @ {n = ”UpdateTime”; e = {if ($ _. Name -match “Updated \ son \ s (\ d {1,2} \ / \ d {1,2} \ / \ d {4} \ s \ d {2}: \ d {2}: \ d {2}) \) $ ”) {[dateTime] :: Parse ($ Matches [1], ([Globalization.CultureInfo] :: CreateSpecificCulture (' en-US ')))}}}, @ {n = ”ReleaseID”; e = {$ _. GetValue (“ReleaseID”)}}, @ {n = ”Branch”; e = {$ _. GetValue ( "BuildBranch")}}, @ {n = "Build"; e = {$ _. GetValue ("CurrentBuild")}}, @ {n = "ProductName"; e = {$ _. GetValue ("ProductName") }}, @ {n = "InstallTime"; e = {[datetime] :: FromFileTime ($ _. GetValue ("InstallTime"))}}};
You can copy this command directly into PowerShell, because it is quite long. We execute it, and then we have to execute this other command:
$ AllBuilds | Sort UpdateTime | ft UpdateTime, ReleaseID, Branch, Build, ProductName
When you have done this, you are going to see that you already get the update history of Windows 10. So you can see everything that has been installed, its date, ID ...