
If the message appears on your computer screen “Windows could not automatically detect your network proxy settings”, you are facing one of the most common errors that occur in the Microsoft operating system. A really annoying error, because it prevents the Internet connection from being made correctly, but for which there are solutions, as we are going to see.
The first thing we must know is the meaning of the error. Know what exactly is going wrong, preventing the Internet connection from establishing properly. Only then will we fully understand how to implement the correct solution.
What does this error mean?
Although most Internet users already know it, it is worth remembering the role of a server proxy as an intermediary between the device that connects to the Internet and the web server with which the connection is going to be established. The proxy is responsible for sending the access request.

Configuring a proxy in a certain way can be very useful to preserve our privacy. The idea is that the page with which we connect will not be able to know the IP of our computer, but rather that of the proxy. It also serves to access a restricted or prohibited website in our country.
However, manually modify proxy settings can be a source of errors. If it is not done correctly or if there are any loose ends, you may get the error “Windows could not automatically detect your network proxy settings”.
But the origin of the error can also be a failure to obtain the IP when browsing or any other conflict in the network configuration. Knowing where the problem is will help us choose the right solution.
Solutions within our reach
If you have already tried to fix the problem with the classic solution of turn the computer off and on again and the router (As simple as it sounds, that's enough in most cases), we invite you to try a series of methods to resolve the error "Windows could not automatically detect your network proxy settings". We recommend applying them in the same order in which we present them here:
Windows troubleshooter

In the first place, we must go to the tools that the system itself offers us to solve operating problems. So, before trying more complex solutions, give a vote of confidence to the Windows troubleshooter. These are the steps to follow:
- To get started, we click on the gear icon in the start menu to access the Windows settings.
- On the next screen, we go to the option "Network and Internet".
- In the left column, we click "Condition".
- Next, we go to the option "Advanced network settings", which is inside the “Network troubleshooter” section.
Once the solver has started, we just have to follow the steps that are indicated, specifying which one is ours (WiFi or Ethernet). In this way, Windows will automatically review the most common problems related to the Internet connection. Perhaps among them is the one that causes the error that we want to solve.
Check Proxy Settings
If the Windows troubleshooter hasn't given us the help we wanted, we should look at the proxy. It is very likely that the source of the error is there. This is what we should do:
- As in the previous method, you have to click on the gear icon in the start menu. This way we will access the Windows settings.
- Then we select the section "Network and Internet".
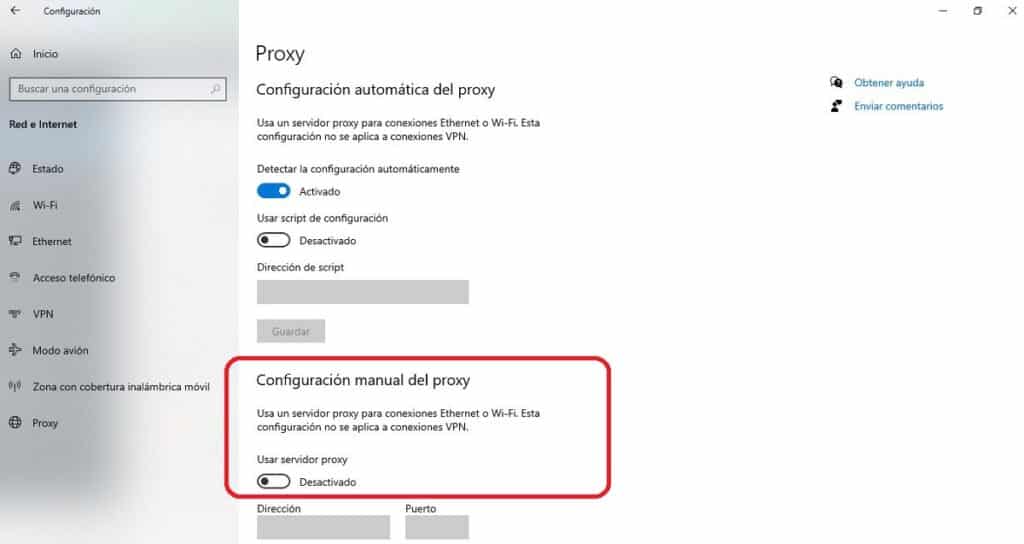
- In the left column, we click Proxy.
- In case the manual proxy configuration was activated, we proceed to deactivate it and delete the data.
- Finally, we restart the computer.
If the error persists, or if we were unable to implement this solution because manual proxy settings were not enabled, we proceed to the next method:
Check IP configuration

Another possible source of this error is an incorrect IP configuration of our team. We can check it like this:
-
- We first access the Configuring Windows by clicking the gear icon in the start menu. This is how we will access
- There, we go to the section of "Network and Internet".
- In the left column, we choose between the options Ethernet or WiFi, depending on the medium of the connection.
- Next, in the category of “Related configuration options” (in the right column), we select "Change adapter options".
- In the window that opens, click with the right button on the connection that we are using. Then, in the pop-up window, click on the option "Properties".
- Now we are going to "Internet Protocol Version 4" and then to "Properties".
- Finally, in the new window, we check that the options of "Get address automatically."
The last step is to restart the computer and verify that the error has definitely disappeared.
Check LAN settings
If nothing has worked so far, it doesn't hurt to also check the LAN configuration of our team through these simple steps:
- We use the key combination Windows + R to open the run window.
- In the box we write inetcpl.cpl and click OK.
- Once the window is open internet properties, First we click on the tab Local and then on the button LAN configuration.
- Finally, the window opens “Local Area Network (LAN) Settings”, where we will check if the option is marked "Automatically detect settings."
Commands to reset the IP
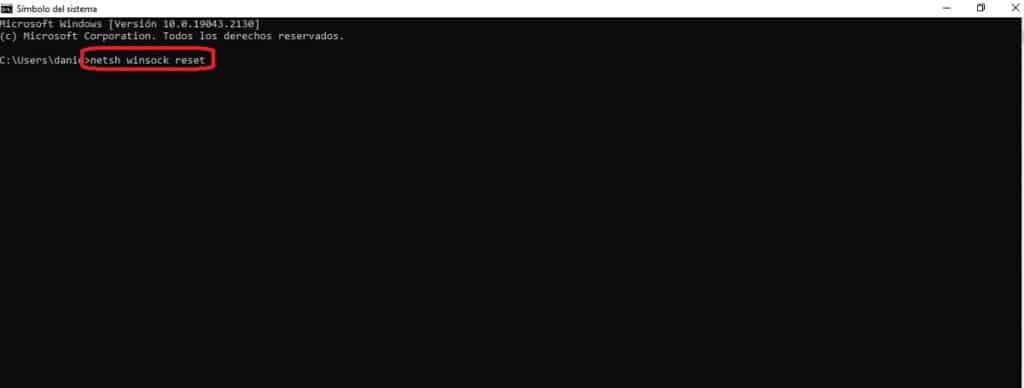
A last resort to solve the problem is provided by the windows command console (the "command prompt"). It consists of starting the window and trying one of these commands:
- netsh winsock reset.
- netsh int ip reset.
- ipconfig /release.
- ipconfig /renew.
- ipconfig /flushdns.
- sfc / scannow.