
Snipping is a Windows application that comes natively built into the operating system. With it, we can take partial screenshots that we can then save, edit and share. Now in the new version of Windows 11 snips We found new and interesting improvements.
In fact, the changes are so far-reaching that Microsoft has decided to change its name. Now, the renewed "Snipping" tool, whose name in English was in Windows 10 Snip & Sketch (cutting and drawing), is renamed Snipping Tool (snipping tool).
The first thing that calls the attention of this new tool for screenshots is the aesthetic section. It is not fundamental, although it is important. In this sense, it is worth mentioning the update to winUI controls, thanks to which a greater uniformity is achieved with respect to the environment of Windows 11. We also find a more fluid design, with rounded corners. In short, more pleasant for the user from the visual point of view.

New functions
However, what really interests us about the new Snipping tool in Windows 11 is everything we can do with it. All the features of the app for Windows 10 are available. Now we must also add new ones.
In Windows 11, Snipping can be accessed with both the mouse and the keyboard by pressing Windows + Shift + S. By doing this, the desktop will darken at the same time we select an area to take the screenshot. If we use the mouse, we simply have to click on the "New" option to freeze the screen. Then, you just have to select the area of the screen that you want to cut out.
split screen

The three classic buttons that appear in the upper right corner of all Windows screens (maximize, minimize and close) are also present when we open the new Windows window. Snip & Sketch. The difference is that now mouse over the maximize icon, we will access the option of split screen in two, three and even four parts, with various designs available, as shown in the image above.
Screenshot modes
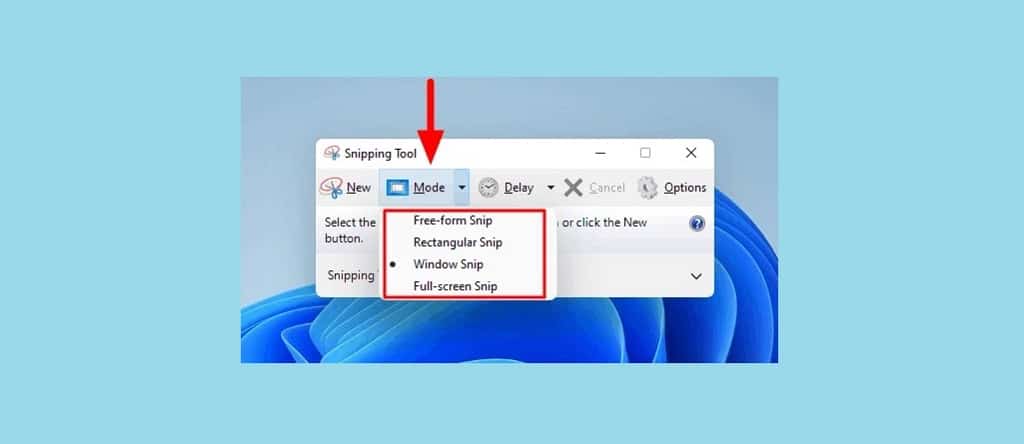
Before clicking on the “New” option to run a new screenshot, you can select the outline shape of the screenshot thanks to the tab "Mode". These are the available options offered in the dropdown menu:
- rectangle mode, which is selected by default.
- Window mode, to take a screenshot of the entire window.
- Full screen mode, this mode makes us the complete capture of our screen (not only of the window).
- free form mode. It is the one that we must choose to customize the shape of the portion of the screen that we want to capture.
Timer
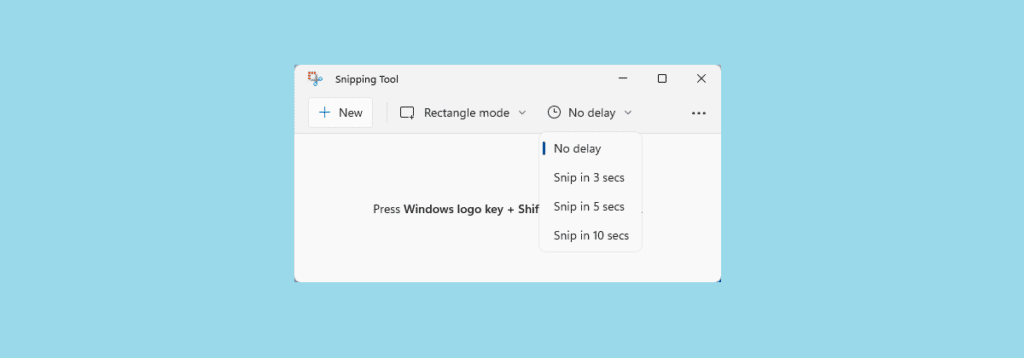
This is a really useful function that solves one of the most common problems that we have when taking screenshots with the Snipping tool. It has happened to all of us: when trying to take a screenshot, but when we go to do it, it has changed. This happens when it comes to dynamic websites. In Windows 11 this will no longer happen to us thanks to with a timer.
Next to the option that we have mentioned before of "Rectangle mode", there is another button where we read "Without delay". Clicking on it opens a new drop-down menu:
- Without delay.
- Trim in 3 seconds.
- Trim in 5 seconds.
- Trim in 10 seconds.
These time lapses refer to the seconds it will take for the screenshot to take place. It is a very practical time that the application gives us to prepare the capture as we wish.
More options
In the upper right corner of the screen we find the icon of the three points that gives us access to more options:
- Open file, to load a file that we already have on our computer.
- Post comments, which opens a new window to access the opinion center.
- Configuration. Here we find a series of options to customize the tool (shortcut, dark mode, activate crop contour, etc.).
- tips and tricks, to learn more details about this tool.
Capture editing
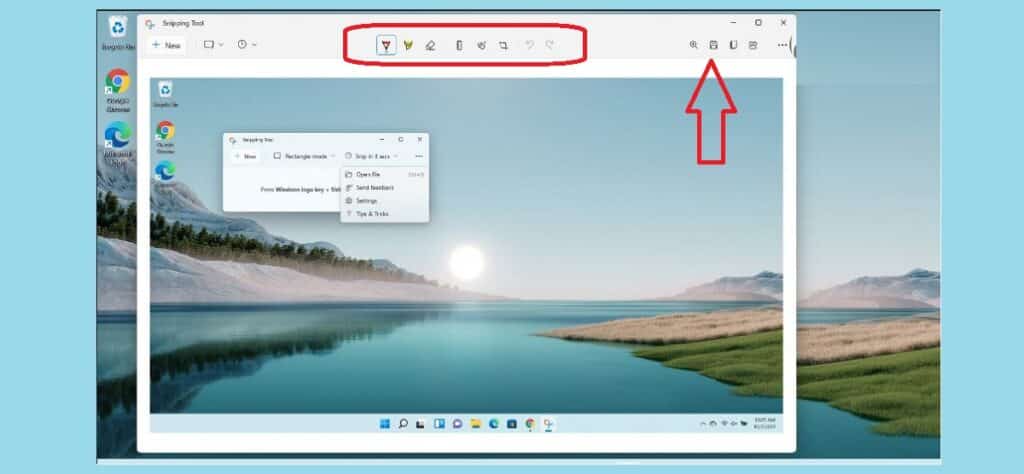
Finally, one of the most outstanding innovations: a series of tools that is integrated in the upper part of the screen of the capture made. These editing tools They are, from left to right: various styles of pens, are different colors and thicknesses, markers to highlight certain important areas, the eraser, the ruler, the touch screen option, a crop tool and the classic undo and redo buttons.
But there are more tools to edit the crop further to the right: the icons to zoom in, save the capture, copy the image or share it by email and through other applications installed on our computer.
Conclusion
The rundown, Windows 11 Snipping Tool – Snipping Tool It matches and improves on the built-in app in Windows 10. Its enhancements give us many new ways to improve the capture process and your bottom line.